Nord Sample Editor 3 Online Guide
The Nord Sample Editor
The Nord Sample Editor is a tool for creating custom sample instruments, playable on your Nord. Simply drop audio files (.wav or .aiff) on the desired key, set Start, Stop and Loop points in the waveform editor and your custom sample is ready to be transferred to your connected Nord.
Editing in the Nord Sample Editor is non-destructive. This means that audio files on the computer are not altered and are only used for generating a Nord sample instrument. The file extension for the sample instrument is .nsmp3. All edits and settings used for generating the sample instrument are saved as a project. The extension for the project file is .nwiproj.
Importing audio files
To create a sample instrument, one or more audio files first need to be imported to the project. Individual audio files can be dragged and dropped directly to the desired keys on the keyboard.
An automated import can be performed by pressing “Import” and selecting one or more files. These files are automatically scanned for pitch and silence, allowing multiple samples to be identified and mapped to the keyboard from a single imported audio file.
For automatic import of multiple samples from one file to work well, it is important to keep these two things in mind:
- Pitched samples should be arranged from low to high pitch in the audio file
- There should be complete silence between each sample
The key which plays back the sample exactly the way it sounds in the audio file is called the root key and is marked with a filled circle. The range covered by a sample on the keyboard is called a zone.
Once one or more audio files have been imported, the “Audio File” zoom mode can be used for seeing precisely which sample was assigned to which note number – especially useful when multiple samples were imported from one audio file.
Selecting and editing zones
Select a zone for editing by clicking within its zone on the keyboard. The selected zone is indicated by an orange header bar above the keyboard. Editing is performed only on zones that are selected. Use the Left and Right keys of the computer keyboard for quickly switching between adjacent zones.

To select all zones for editing at once, use the “Select All” button. Shift + Mouse Click and Ctrl/Cmd + Mouse Click can be used for selectively editing multiple zones on the keyboard.

Setting sample Start and Stop positions
Use the handles in the waveform editor to adjust the “Start” and “Stop” positions.
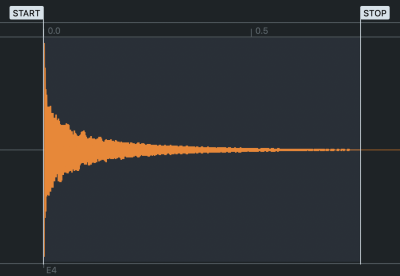
The “Start” zoom button can be used for a better view when adjusting the start. Use the mouse scroll wheel to zoom in and out on the waveform. Click and drag the mouse up or down to zoom the waveform vertically. Press the “Start-Stop” zoom button to return from the zoomed-in view.

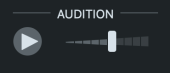
Press the Audition play button to hear how the sample, with all edits including loop settings, will sound when played back on the Nord. “Config” in the toolbar allows for selecting an audio interface for sound playback.
Adjusting zone range and moving root keys
To adjust the keyboard range for a zone, drag its left or right boundary handle. Zones can be detached by right-clicking on a handle and selecting “Detach”. Keys between the detached zones will not play back any sample at all and be silent.
Note: Silent zones are not supported in the NSMP 2 format. See “Compatibility and Formats” further down for more info.
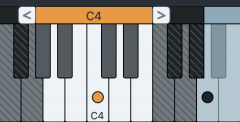
Samples can be moved manually by grabbing its root key and dragging it. When all samples are selected this can be used to move all samples, in order to transpose or octave shift the sample instrument.
Transfer the sample instrument to your Nord
Give the sample instrument a suitable name in the “Sample Instrument Name” field and select an appropriate category from the “Category” drop down menu. If “Dynamics” are enabled, appropriate settings for amplitude, filter velocity response and envelope shape, are applied to the sample instrument based on the chosen category.

Pressing the ”Save & Transfer To Nord” button saves the project and creates the sample instrument in the project folder. By default, this is the folder from where an audio file was first imported to the project. The sample instrument is then transferred to the Nord and selected for playing.
The project can be saved to a different location by pressing “Save As” in the toolbar.
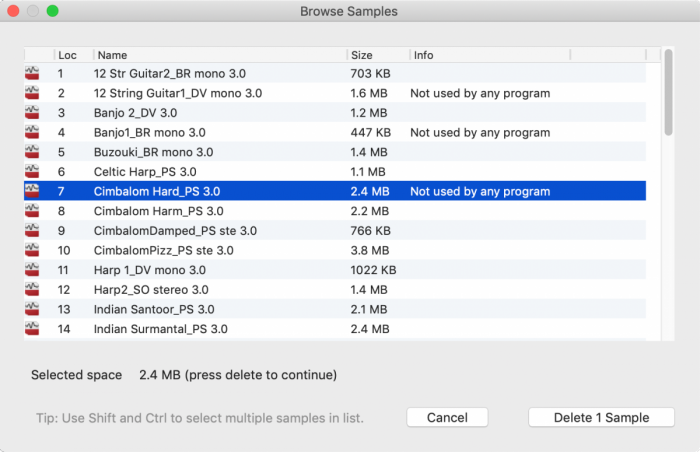
If there is not enough free memory in the Nord, the “Manager” window allows for finding and deleting samples from the Nord sample memory. Samples that are “Not used by any program” can be deleted without affecting programs in the Nord program banks.
Loop functions
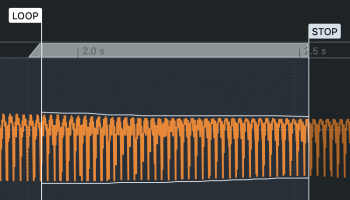
When a sample is set to “Looped” it will, when reaching the Stop marker, jump back to the Loop position and in this way play indefinitely. The loop range is defined by dragging the Loop and Stop markers to the desired locations. The “Loop” zoom button zooms in on the looped audio region, allowing for more precise marker placement.
To avoid a harsh sound at the jump point it is necessary to find an optimum loop point. To aid this process some tools are available:
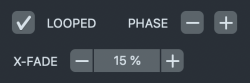
- X-FADE: Applies a cross-fade to the loop point. This cross-fade is represented in the waveform graph as a triangular area to the left of the loop. The cross-fade length can be set to values between 0-100% of the loop.
- PHASE: Adjusts the phase angle at the loop point. This can be used to ensure an even sound level during the cross fade.
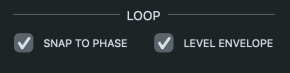
- SNAP TO PHASE: The Loop and Stop points will snap to phase-correct positions, in relation to the pitch of the sample, when moved. This helps avoid unnatural drops in sound level during the loop cross fade, especially when working with pitched material.
- LEVEL ENVELOPE: Display a representation of the waveform amplitude throughout the looped audio region. This is a useful visual aid when adjusting the X-fade and Phase parameters.
Further Zone Properties
To refine or further customize the sample instrument, there are some additional zone properties:
“Fade In” applies a short fade-in to the sample start, which eliminates any click sound when the note is played. Select “Fade Out” to apply and define a fade-out for the sample. If the sample is not looped the available fade-out time is relative to the sample length. For looped samples the fade-out determines how the level decays over time as the loop is being played.
Note: Combining Loop and Fade Out is supported in the NSMP2 format. See “Compatibility and Formats” further down for more info.
When “Unpitched” is checked the sample does not change pitch throughout its zone and will sound the same regardless of which key it is played from.
The “Level” and “Tune” controls are used for adjusting the sound level and for fine tuning the selected sample, respectively. The “Normalize” option in the “Tools” drop-down menu adjusts the Level for all samples at once so that they are all played back at an equal level, if necessary. Sound levels can also be restored by selecting reset from the “Tools” drop-down.
Copying and pasting zone properties
The zone properties and loop defined for a sample can be transferred to other samples. Use the “Copy Zone” option in the “Tools” drop-down to copy the zone properties and loop points for the focused sample. Then select one or more other samples and select “Paste Zone Properties”.
Manual Import
The drop-down menu of the “Import” button provides a Manual Import option. In its dialog window, select one or more audio files and then choose the start key for the first sample and the interval at which samples should be assigned to the keys.
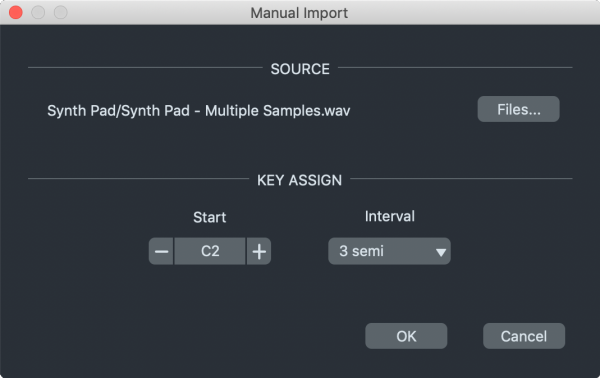
If importing one audio file which contains multiple samples, the file is divided, and individual samples assigned to the keyboard based on the settings for start key and interval. If importing multiple audio files, each audio file is assigned to a separate key according to the chosen interval, unless the files are named with note name in which case those are used for assigning keys. The note name consists of the name of the note (C, C#, D etc.) followed by a number corresponding to which octave (0-8) it is placed in, e.g. “C4”.
Keyboard shortcuts and mouse gestures
There are many convenient keyboard shortcuts and mouse gestures available, which help speed up and simplify the process of creating a sample instrument. Turn on “Tool Tips” in the toolbar to show what these shortcuts and gestures are for each component of the user interface, when hovering over them.
Other toolbar options
Press “Open” to locate and open an existing project.
All toolbar buttons marked with a small down arrow provide additional functions:
- Open: Press the arrow to show a list of recent projects.
- Save As: Use the “Save” option to save the project without transferring the sample instrument to the Nord.
- Tooltip: Select “View Online Help” to open this help page in your browser. “About” shows version and compatibility information.
Compatibility and formats
The Nord Sample Editor 3 is capable of generating two different output formats for sample instruments: NSMP 3 (.nsmp3) or NSMP 2 (.nsmp). There are a few limitations as to what features are supported by the NSMP 2 format:
- Silent zones are not supported in the NSMP 2 format. In these instances, the closest sample above the silent zone will instead be stretched down.
- Combining Loop and Fade Out is not supported in the NSMP 2 format. In these cases the Loop will be used but not the Fade Out.
“Config” provides a setting for Default Output Format for sample instruments. This setting is used when no Nord is connected and its options are NSMP 2 and NSMP 3. Choose the appropriate format according to the compatibility lists below.
NSMP 3 Instruments
- Nord Stage 3
- Nord Electro 6
- Nord Piano 4
- Nord Grand
- Nord Wave 2
NSMP 2 Instruments
- Nord Stage 2 / 2EX
- Nord Electro 5
- Nord Electro 4
- Nord Electro 3
- Nord Electro 3HP
- Nord Piano 3
- Nord Piano 2
- Nord Wave